How to Make AI Math Visuals That Get the Numbers Right: A Matrix Prompt Guide
AI image models draw beautiful chalkboards full of wrong math. Learn a solve-first workflow, number-picking rules, and copy-paste prompts for accurate matrix flashcards, worksheets, and social posts.
Ask Nano Banana for "a chalkboard showing how to solve a system of equations" and you'll get a gorgeous chalkboard covered in numbers that are almost certainly wrong. Better adjectives won't fix it. Doing the math before you write the prompt will. Solve the system with an augmented matrix calculator first, then give the model the exact values to draw. That one habit is the difference between a pretty worksheet and one a student can actually learn from.
This guide is for teachers, tutors, students and content creators who want AI images for linear algebra: flashcards, slides, worksheet headers and social posts. It covers why image models fumble matrices, a three-step workflow, and prompts you can copy and paste.
Why Image Models Get Matrices Wrong
An image model doesn't calculate. It paints what a "math board" usually looks like. Text rendering has improved a lot, and newer models can write a clean headline. A matrix is harder than a headline, though, for a few reasons:
- Every character carries meaning. A missing minus sign or a 3 swapped for an 8 turns a correct answer into a wrong one, and at a glance it still looks fine.
- Alignment is part of the math. Columns have to line up. In an augmented matrix, the vertical bar has to sit before the last column, or it's no longer the same system.
- The model fills empty space. If you don't say what goes in each cell, it invents numbers that look plausible. Ask it to "show the steps" and it will draw steps. They just won't be real ones.
So treat the model as an illustrator, not a mathematician. You supply the content, and it supplies the look.
The Workflow: Solve, Simplify, Then Prompt
Step 1: Solve It With a Real Tool
Pick the problem and get the answer from a calculator or solver you trust. For a system of equations, enter it as an augmented matrix and reduce it to RREF (reduced row echelon form). For an inverse, use the matrix menu on a graphing calculator. If you're unsure of the keystrokes, here's a walkthrough on how to find the inverse of a matrix in a calculator.
If your calculator shows ERR:SINGULAR MAT, the matrix has no inverse because its determinant is zero. Don't ask the model to draw one anyway. It will happily invent an inverse that doesn't exist.
Step 2: Choose Numbers the Model Can Draw
The friendlier the numbers, the better the image. A few rules from experience:
- Stay at 3×3 or smaller. Every extra row and column is another chance for the model to drop or duplicate a value.
- Use integers. Fractions like 7/12 stacked inside brackets are where text rendering breaks down most often.
- For inverses, pick a matrix whose determinant is 1 or −1. Its inverse will contain only integers. A classic example: A = [1 2 3; 0 1 4; 5 6 0] has a determinant of 1, and its inverse is [−24 18 5; 20 −15 −4; −5 4 1].
- Keep values short. Two-digit numbers are fine. Long decimals are not.
We'll also use one system of equations in this guide:
- x + y + z = 6
- 2y + 5z = −4
- 2x + 5y − z = 27
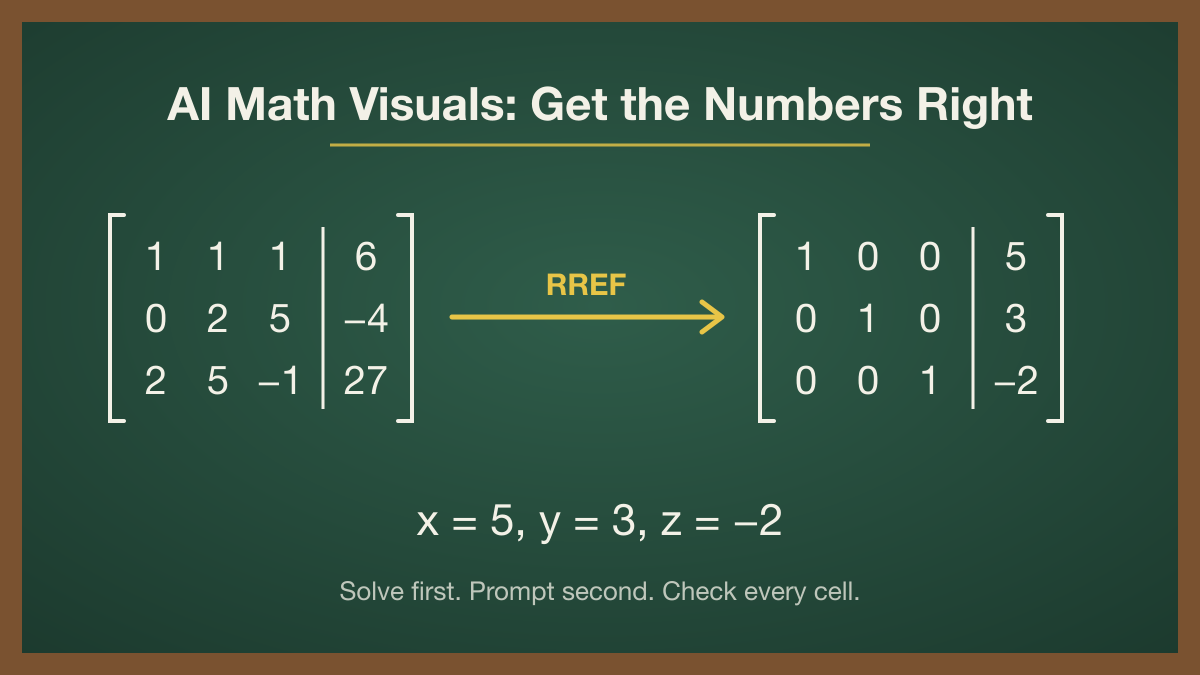
Its augmented matrix is [1 1 1 | 6; 0 2 5 | −4; 2 5 −1 | 27]. Reduced to RREF, it becomes [1 0 0 | 5; 0 1 0 | 3; 0 0 1 | −2], so x = 5, y = 3 and z = −2.
Step 3: Write the Numbers Into the Prompt, Row by Row
Describe the matrix the way you'd read it aloud: row by row, left to right, with each row in quotes. Then say what must not appear.
Copy-and-Paste Prompts
Chalkboard: Augmented Matrix to RREF
A realistic classroom chalkboard, photographed straight on, soft daylight. White chalk handwriting, neat and large. On the left, an augmented matrix with three rows, square brackets, and a vertical bar before the last column. Row 1: "1 1 1 | 6". Row 2: "0 2 5 | -4". Row 3: "2 5 -1 | 27". An arrow labeled "RREF" points right to a second matrix with the same layout. Row 1: "1 0 0 | 5". Row 2: "0 1 0 | 3". Row 3: "0 0 1 | -2". Below it, the text "x = 5, y = 3, z = -2". No other numbers or equations anywhere on the board.Flashcard: Inverse of a 3×3 Matrix
A clean flat-design flashcard on a white background, rounded corners, subtle shadow. Title at the top: "Inverse of a 3x3 Matrix". Left side: "A =" followed by a matrix in square brackets. Row 1: "1 2 3". Row 2: "0 1 4". Row 3: "5 6 0". Right side: "A⁻¹ =" followed by a matrix in square brackets. Row 1: "-24 18 5". Row 2: "20 -15 -4". Row 3: "-5 4 1". Small footer text: "det(A) = 1". Sans-serif font, dark navy text, columns perfectly aligned. No extra text.Social Post: "Check Your Work" Infographic
A vertical 4:5 infographic in a friendly pastel style. Headline: "Did you get it right?" Show the equation "A × A⁻¹ = I" in large type. Below it, the 3x3 identity matrix in square brackets. Row 1: "1 0 0". Row 2: "0 1 0". Row 3: "0 0 1". Add a small cartoon calculator character giving a thumbs up. No other math on the image.You can swap the style line (chalkboard, flashcard, notebook paper, neon sign) as often as you like. Keep the matrix lines exactly as they are. The numbers are the one part you never let the model improvise.
Check Every Cell Before You Share
Errors creep in during generation, so proofread the image the way you'd proofread a worksheet:
- Count the rows and columns. Models sometimes add a fourth row as filler.
- Compare each entry with your calculator output. Check the minus signs first, because they're the most common casualty.
- Check the bar. In an augmented matrix, it belongs before the last column and nowhere else.
- Fix the image instead of starting over. If one cell is wrong, use editing mode: "Change the middle entry of row 2 to -15 and keep everything else identical." A targeted edit usually keeps the rest of the image intact, while a fresh generation may break something that was already right.
- Zoom in. At thumbnail size, a 3 and an 8 look alike. Students will see the full-size version.
If the image still isn't right after a couple of edits, it's often faster to let the AI make the background and layout, then type the matrix on top in a slide or design tool. That isn't cheating. It's using each tool for what it does well.
The Takeaway
AI image models are excellent at making math look inviting and poor at making it correct, so keep those two jobs separate. Let a calculator handle the arithmetic, choose numbers that render cleanly, spell out every value in the prompt, and check the result cell by cell. You'll end up with visuals that look good and are safe to teach from.
Author

More Posts
The Viral ChatGPT Caricature Prompt: How to Roast Yourself Professionally
Looking for the viral ChatGPT caricature prompt? Get 30+ copy-paste prompts for every job (Tech, Medical, Corporate). Master the 3D Pixar, Cyberpunk, and Editorial styles instantly.

Fix the Photo Before You Prompt: How Blurry Reference Images Wreck AI Portrait Edits
Blurry selfies make AI image models invent a new face. Learn a 10-second reference photo check, when to use faithful vs. generative unblurring, and prompts that keep identity intact.

Explore 6 Unique AI Transformations: From Academia to Anime Reality
Discover six distinctive AI image generation styles - from Dark Academia elegance to Gundam mecha transformations, minimalist fashion to anime-to-real conversions. Learn how to transform your photos with professional techniques and creative prompts.